Desserts
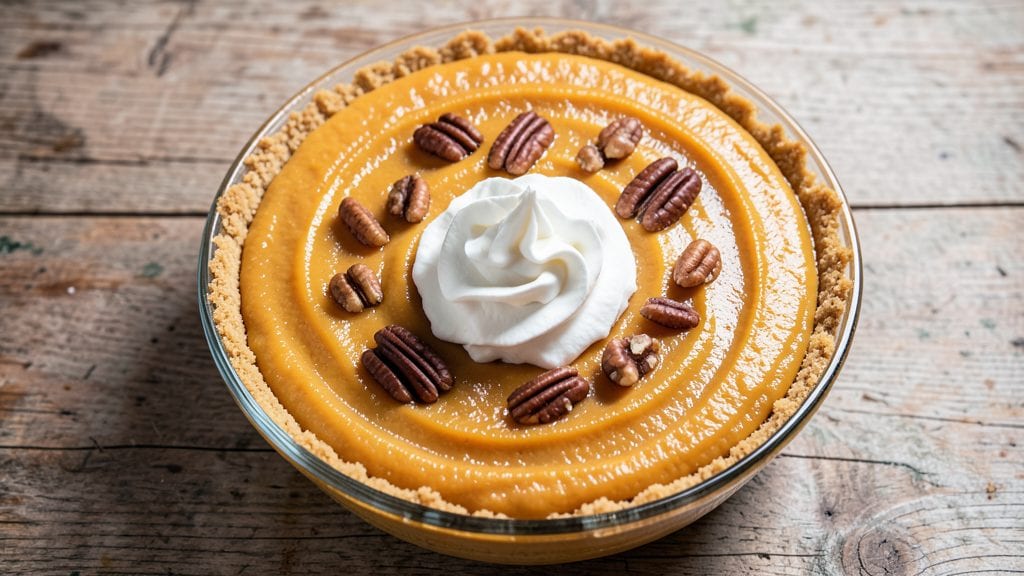
This Libby's no-bake pumpkin pie recipe delivers all the classic fall flavors without requiring oven time or crust assembly—just a few simple ingredients and patience. The secret lies in a creamy filling made with Libby's canned pumpkin, which provides that signature velvety texture while keeping preparation straightforward.
I've perfected this version over years of holiday baking, ensuring the spice blend remains balanced and the texture stays perfectly set after chilling.
What makes this recipe truly special is how it transforms basic pantry staples into a dessert that feels indulgent yet effortless. The filling combines warm cinnamon, nutmeg, and ginger with a touch of vanilla for depth, all stabilized by a simple cornstarch mixture that ensures a smooth, pudding-like consistency.
Unlike traditional pies, this version skips the oven entirely—just assemble, chill, and serve.
By the time you slice into this pie, you'll find layers of rich pumpkin filling with a velvety mouthfeel that's neither too sweet nor overly spiced. The chilling process allows flavors to meld beautifully, creating a dessert that's perfect for holiday gatherings or quiet weeknight treats.
No one will guess it required no baking at all.
Pair it with whipped cream or a scoop of vanilla ice cream for an extra touch of elegance. The best part? You can prepare this pie a full day ahead, making it ideal for stress-free entertaining. Let's get started on this foolproof no-bake classic.
Ingredients for libby's no bake pumpkin pie
Pantry staples and Libby's pumpkin deliver restaurant-quality pie without oven or crust.
| Ingredient | Amount | Notes |
|---|---|---|
| Libby's Canned Pumpkin Puree 🎃 | 15 oz | Not pumpkin pie filling |
| Heavy Whipping Cream 🥛 | 1 cup | Full-fat for best texture |
| Granulated Sugar 🍚 | ¾ cup | Adjust for sweetness preference |
| Light Corn Syrup 🍯 | ½ cup | Karo brand preferred |
| Unsalted Butter 🧈 | ½ cup | Cold, cubed for texture |
| Large Eggs 🥚 | 2 whole | Room temperature preferred |
| Ground Cinnamon 🌶️ | 2 tbsp | Freshly ground preferred |
| Ground Nutmeg 🌿 | 1 tsp | Freshly grated nutmeg better |
| Ground Ginger 🌶️ | 1 tsp | Fresh ginger preferred |
| Pure Vanilla Extract 🍯 | 1 tbsp | High-quality preferred |
| Fine Cornstarch 🌾 | 2 tbsp | Diamond Crystal preferred |
| Sea Salt 🧂 | ¼ tsp | Fine grain preferred |
| Whipped Cream 🥛 | 2 cups | For serving, optional |
The Libby's canned pumpkin is non-negotiable here—it provides that signature velvety texture that fresh pumpkin can't replicate. Grocery store brands work fine, but avoid pumpkin pie filling (it's already sweetened). For the spices, Penzeys or bulk bins offer the freshest ground options—nutmeg and ginger are where flavor really shines. The heavy whipping cream should be cold when you measure it; let it sit at room temperature for 10 minutes before whipping. Diamond Crystal cornstarch is my go-to for pie fillings—it's finer than most brands and sets beautifully without graininess.
No vanilla extract? Pure vanilla bean paste works in a pinch (use half the amount), or vanilla sugar at a 1:1 substitution. Running low on corn syrup? Honey or maple syrup can replace it, but reduce the sugar by 1 tablespoon to balance sweetness. For a dairy-free option, full-fat coconut cream replaces the whipping cream, though texture will differ slightly. The whipped cream topping is optional but recommended—store-bought is fine, but homemade with a pinch of vanilla and cinnamon tastes like you put in effort (even if you didn't).
This pie must chill for at least 4 hours—overnight is ideal. Store leftovers in an airtight container for up to 5 days in the fridge. The filling thickens as it sits, so if it seems too soft after chilling, let it sit at room temperature for 10-15 minutes before serving. For make-ahead entertaining, prepare the filling 2 days ahead and assemble the pie the morning of—flavors deepen with time. Serve in 8-ounce ramekins for individual portions or one large pie dish for a crowd.
Why You'll Love This Recipe
- Here’s what sold me: the balance. Libby’s pumpkin isn’t too watery, and the corn syrup keeps it silky without tasting artificial. The whipped cream topping? Fluffy but not sweet enough to overpower the pumpkin’s natural depth. It’s the kind of dessert that feels indulgent but doesn’t leave you regretting it.
- I’ll be real: this tastes like a gourmet pie but costs less than $10 to make. Libby’s pumpkin is a pantry staple, and the rest—cream, sugar, butter—are basic ingredients I already have. Plus, the leftovers? I freeze slices in individual portions and pull them out for breakfast toast. Fancy, but practical.
Step-by-step instructions for Libby's no-bake pumpkin pie
Here's how to create a silky-smooth no-bake pumpkin pie using only your mixing bowl and refrigerator.
Whisk Together the Wet Ingredients
In a large mixing bowl, combine the 15 oz Libby's canned pumpkin puree, 1 cup heavy whipping cream, 0.75 cup granulated sugar, and 0.5 cup light corn syrup. Use a whisk or electric mixer on medium speed to blend everything thoroughly until the sugar fully dissolves and the mixture is completely smooth. This ensures no graininess remains in your final pie filling.
Next, add the 2 whole large eggs, 1 tbsp pure vanilla extract, and 0.25 tsp sea salt. Continue mixing for an additional 1-2 minutes until the eggs are fully incorporated and the mixture is uniform in texture. The batter should now be thick but still pourable—this consistency is crucial for proper setting later.
Incorporate the Spices and Cornstarch
In a small bowl, thoroughly mix together the 2 tbsp ground cinnamon, 1 tsp ground nutmeg, 1 tsp ground ginger, and 2 tbsp fine cornstarch. This step prevents clumping and ensures even distribution of spices throughout the pie.
Gradually sprinkle the spice mixture into the wet ingredients while continuing to mix on low speed. Be patient and mix for 1-2 minutes until the cornstarch is completely dissolved and the batter becomes slightly thicker. You're looking for a smooth, velvety texture with no visible streaks of flour or spices. This step is what transforms your filling from basic to restaurant-quality.
Melt and Incorporate the Butter
In a small saucepan over low heat, gently melt the 0.5 cup unsalted butter without allowing it to brown. Butter burns quickly and will impart a bitter flavor to your pie. Once completely melted, let it cool for 2-3 minutes until it reaches room temperature but is still liquid.
With the mixer running on low speed, slowly pour the melted butter into the pumpkin mixture. Mix for 30-45 seconds until fully combined. The butter should be evenly distributed throughout the filling, creating a rich, moist texture. If you notice any separation, give it one final mix to ensure everything is perfectly homogenous.
Chill the Filling for Proper Setting
Cover the mixing bowl with plastic wrap pressed directly against the surface of the filling to prevent a skin from forming. Refrigerate for at least 4 hours or preferably overnight. This extended chilling time is essential for the pie to achieve its perfect, jiggly texture.
During this time, the cornstarch will fully activate, creating that signature pumpkin pie consistency without any baking. The filling should thicken noticeably but still maintain a smooth, velvety texture when stirred. Pro tip: For even better results, place the bowl on a tray to catch any potential drips during chilling.
Assemble and Serve
Once properly chilled, spoon the filling into your prepared pie crust or serving dishes. If using a crust, press it gently into the bottom and sides for even distribution. Top with 2 cups whipped cream and serve immediately or refrigerate for up to 24 hours before serving.
The pie should have a smooth, almost custard-like texture with a perfect balance of sweetness and spice. Each bite should deliver that classic pumpkin flavor without any crust interference. For best presentation, garnish with a sprinkle of additional cinnamon or a few pumpkin seeds.
Pro Tips For Making Libby'S No Bake Pumpkin Pie
- Chill the Cream First: I learned this the hard way—whipping cold heavy cream straight from the fridge gives you stiffer peaks, which is non-negotiable for this pie. Skip the room-temperature step and pop the cream in the freezer for 10 minutes before whipping. Your filling will hold its shape instead of sliding into a puddle.
- Melt Butter Slowly: This isn’t the prettiest method, but it’s the tastiest: melt the unsalted butter in the microwave in 10-second bursts, stirring between each, until just liquid. Dumping it in hot and fast makes it seize up, and you’ll end up with grainy filling. Patience here means a smoother texture.
- Measure Pumpkin Precisely: Libby’s canned pumpkin varies in thickness—don’t eyeball it. Use a kitchen scale for 454g (15 oz) or measure it straight from the can into your bowl. Too little pumpkin makes the filling too sweet; too much makes it watery. Stick to the recipe’s volume, and you won’t second-guess the balance.
- Press Crust Firmly: Don’t just slap that crust into the pan and call it a day. Press it down hard with a glass or your knuckles, especially the edges, so it doesn’t puff up when you pour the filling. A well-sealed crust keeps the pie intact for slicing—no soggy bottoms or messy crumbles. (Yes, even if you’re impatient like me.)
Best sauces and condiments for libby's no bake pumpkin pie
Classic Whipped Cream
No pumpkin pie is complete without a cloud of whipped cream on top. I use 2 cups heavy whipping cream, chilled for at least 4 hours before whipping. Add 1 tablespoon powdered sugar and ½ teaspoon vanilla extract for a sweet, fragrant finish.
Whip to soft peaks—over-whipping makes it grainy. For extra flair, dust with cinnamon or pumpkin pie spice before serving. 🥛
Caramel Drizzle
Elevate your pie with a rich caramel drizzle made from ½ cup granulated sugar, ¼ cup water, and 2 tablespoons unsalted butter. Cook in a saucepan over medium heat until golden, then cool slightly before drizzling over the pie.
The contrast of warm caramel with cool pumpkin filling is pure magic. Store-bought caramel sauce works too—just warm it gently. 🍯
Salted Maple Syrup
For a sophisticated twist, drizzle 2 tablespoons pure maple syrup (like Grade B for deeper flavor) over the pie, then sprinkle with flaky sea salt. The salt enhances the maple’s sweetness while balancing the pumpkin’s spice.
I love using Maine maple syrup for its rich, earthy notes. This pairing feels gourmet without extra effort. 🌿
Spiced Honey Glaze
Combine ¼ cup honey with ½ teaspoon cinnamon and ¼ teaspoon ginger for a glossy, aromatic glaze. Warm gently in a small saucepan until runny, then brush over the pie just before serving.
The honey’s floral notes complement the pumpkin’s warmth. For extra shine, add 1 teaspoon lemon juice to thin the glaze. 🍯
Cream Cheese Swirl
For a creamy, tangy contrast, fold 4 oz softened cream cheese into the whipped cream before topping the pie. Pipe or dollop it over the filling for a marbled effect. The acidity cuts through the sweetness, adding depth. I use Philadelphia cream cheese for its smooth texture. 🧀
Nutty Crunch Topping
Toast ½ cup pecans or walnuts in a dry skillet over medium heat until fragrant, then chop coarsely. Sprinkle over the pie for texture. For extra richness, toss the nuts with 1 tablespoon brown sugar and ¼ teaspoon cinnamon before toasting. The crunch contrasts beautifully with the silky filling. 🌰
Nutrition facts
Frequently asked questions
Can I make this no-bake pumpkin pie without a crust?
Serve the chilled filling in individual ramekins or a large bowl for a crustless version. The texture remains creamy and perfect for scooping with a spoon. For extra flair, garnish with whipped cream or toasted nuts to mimic a pie presentation.
Why does my filling look too runny after chilling?
Runny filling usually means the cornstarch didn't fully activate. Try these fixes: Whisk vigorously for 2 extra minutes when mixing, or add 1 extra tablespoon cornstarch to the wet ingredients. Also ensure your eggs are fully incorporated—they help stabilize the mixture.
Can I substitute evaporated milk for the heavy cream?
You can try it, but the texture will be less rich. For best results, use 1 cup whole milk plus ½ cup melted butter to replace the cream. The fat content is similar, though the flavor will differ slightly. If using evaporated milk, reduce the sugar by 1 tablespoon to balance sweetness.
How do I make this pie ahead of time?
Prepare the filling 2 days ahead and store it in an airtight container in the fridge. When ready to serve, assemble the pie and chill for 4-6 hours. The flavors deepen with time, making it perfect for holiday prep. Leftovers keep well for 5 days in the refrigerator.
What's the secret to getting the perfect spice balance?
Start with the recipe's measurements, then adjust to taste. For deeper flavor, use freshly ground spices—especially nutmeg and ginger. If your pie tastes too sweet, reduce sugar by 1 tablespoon. Too spicy? Add ½ teaspoon vanilla extract** or a pinch of salt to mellow the heat.