Side Dishes
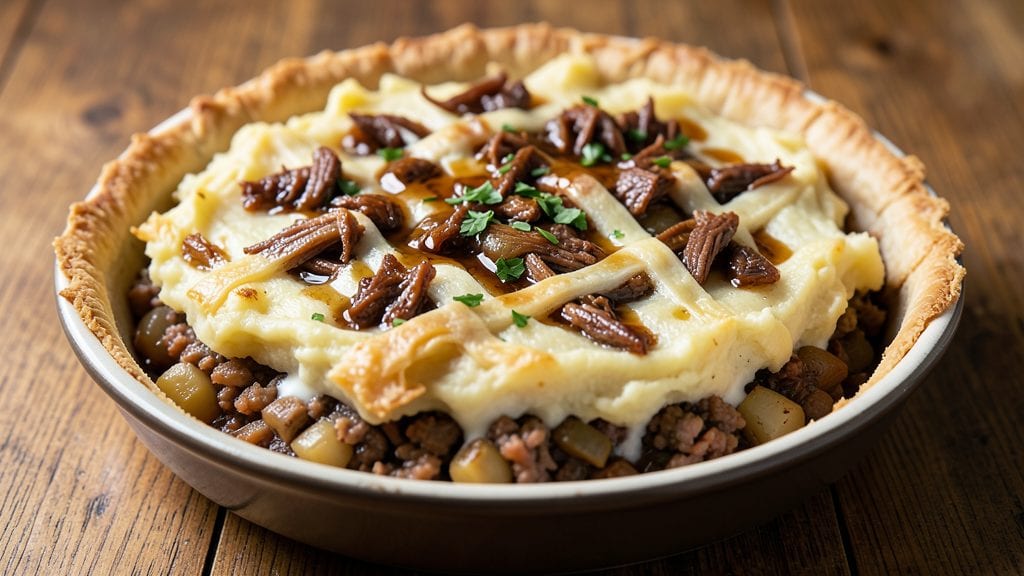
Transforming canned corned beef into a hearty pie with a crisp potato crown topping is the ultimate way to repurpose leftovers into something extraordinary. This recipe combines the rich, savory depth of corned beef with a golden, crunchy potato lattice that holds up perfectly under the broiler.
I developed this method after realizing how quickly canned corned beef could become a centerpiece dish with just a few strategic layers and baking techniques.
The beauty of this pie lies in its simplicity—no fancy pastry skills required, just a few key steps to build flavor and texture.
You'll start with a savory filling of corned beef, potatoes, and onions, all simmered until tender, then topped with thinly sliced potatoes arranged in a classic lattice pattern. The result is a pie that's both comforting and impressive, with a crisp exterior and creamy interior that melts in your mouth.
What makes this recipe stand out is the balance of textures: the tender, flaky potato crown contrasts beautifully with the soft, seasoned filling below. The lattice design not only looks elegant but also ensures every bite delivers that perfect mix of crispy and creamy.
This pie is ideal for meal prep or serving at gatherings—it reheats well and always disappears quickly.
Ready in about 45 minutes, this dish proves that canned corned beef can be the star of dinner without sacrificing restaurant-quality results. The technique is straightforward, but the outcome feels special—just like a homemade classic. Let's get started on creating this comforting masterpiece.
Ingredients for canned corned beef pie
Sixteen ingredients transform humble canned corned beef into a showstopping pie with crispy potato crown.
| Ingredient | Amount | Notes |
|---|---|---|
| Canned Corned Beef 🥩 | 1 lb | Drained, shredded or sliced |
| Russet Potatoes 🥔 | 3 lbs | Yukon gold works too |
| Yellow Onions 🧅 | 2 whole | Medium, thinly sliced |
| Unsalted Butter 🧈 | ½ cup | Full-fat for best flavor |
| Heavy Cream 🥛 | 1 cup | Full-fat preferred |
| Chicken Broth 💧 | 1 ½ cups | Low-sodium preferred |
| Mustard 🍯 | 2 tbsp | Dijon or whole-grain |
| Garlic Cloves 🧄 | 4 cloves | Minced or finely chopped |
| Fresh Thyme 🌿 | 1 tbsp | Leaves only, chopped |
| Salt 🧂 | 1 ½ tsp | Kosher or sea salt |
| Black Pepper 🌶️ | ½ tsp | Freshly ground preferred |
| All-Purpose Flour 🌾 | 2 tbsp | For thickening filling |
| Eggs 🥚 | 2 whole | For egg wash |
The potatoes are the star here—Russets are ideal for their starchiness, but Yukon Golds add natural sweetness. Buy them a few days ahead so they're firm and free of sprouts. Whole Foods or Trader Joe's carry the best quality, but any grocery store's standard Russets work fine. For the lattice, thinly slice them using a mandoline (or a sharp knife if you're careful)—even slices ensure even browning. The corned beef should be shredded or sliced into bite-sized pieces; canned versions like Glass City Corned Beef or Hormel are reliable choices. Avoid the pre-shredded kind—it's often mushy.
No Yukon Golds? Red potatoes work too, though they'll be slightly waxier. Short on thyme? Dried thyme at one-third the amount is fine, but fresh adds that bright herbal note. The mustard can be swapped for 2 tbsp prepared horseradish if you prefer heat. For the filling, if you're using a low-fat broth, add 1 tbsp heavy cream to compensate. The egg wash is non-negotiable—it gives that golden sheen to the potato crown. Room-temperature eggs spread better, so take them out 15 minutes before using. If you're prepping ahead, store the filling and potato slices separately in the fridge for up to 2 days.
This pie reheats beautifully—350°F for 15-20 minutes until the crown is crispy again. Leftovers keep for 4-5 days in the fridge, though it rarely lasts that long. For make-ahead convenience, assemble the pie (without baking) and refrigerate for up to 24 hours. The filling can also be made a day ahead and reheated gently before assembling. Freeze for up to 3 months by wrapping tightly in foil. The potato crown gets slightly softer after freezing, but a quick broil restores its crispness.
Why You'll Love This Recipe
- No-Can’t-Miss Shortcut: I swear by this trick—just open a can of corned beef, dump it in, and let the potatoes and onions soften while you mix the cream. No fancy prep, no chopping like it’s a gourmet show. The canned beef holds its own, so you’re not stuck with mushy texture or last-minute grocery runs.
- Creamy Crisp Contrast: That buttery, fluffy potato top with the rich, briny beef underneath? It’s the kind of combo that makes you pause mid-bite. The onions caramelize just enough to add depth, but the real magic is how the heavy cream ties everything together—silky, satisfying, and impossible to resist.
- Potluck Hero: Honestly, this is my go-to for gatherings where I don’t want to stress. It reheats like a dream, travels well, and even holds up in a cooler. Serve it warm or at room temp—no one will guess it’s mostly canned ingredients. (Yes, even my picky uncle asks for seconds.)
- Budget Buster: Between us, this recipe is my secret for stretching a meal without sacrificing flavor. A single can of corned beef feeds four, and the potatoes and cream stretch it further. Leftovers? They’re even better the next day—crispier edges, richer filling. No waste, all win.
Step-by-step instructions for canned corned beef pie
Here's how to assemble a hearty potato-topped corned beef pie with a crisp golden crust.
Prepare the Potato Crown Topping
Peel the 3 lbs russet potatoes and slice them into ⅛-inch thick rounds using a mandoline or sharp knife. Spread them evenly on a parchment-lined baking sheet and brush lightly with the 0.5 cup unsalted butter, melted. Season immediately with 0.5 tsp black pepper and 0.75 tsp salt.
Bake at 375°F for 25-30 minutes until the edges turn golden and the slices are tender when pierced with a fork. Let them cool completely before using - this prevents a soggy crust. I like to arrange them in overlapping concentric circles to create that classic "crown" effect.
Make the Savory Corned Beef Filling
In a large skillet, melt 2 tablespoons of the remaining unsalted butter over medium heat. Add the 2 whole yellow onions and cook for 5-6 minutes until softened and translucent. Stir in the 4 cloves garlic cloves and cook for 30 seconds until fragrant.
Add the drained 1 lb canned corned beef, breaking it into chunks if needed. Stir in the 1.5 cups chicken broth, 2 tbsp mustard, 1 tbsp fresh thyme, remaining 0.75 tsp salt, and 0.25 tsp black pepper. Simmer for 10 minutes until the liquid reduces slightly and the flavors meld. Remove from heat and let cool for 10 minutes before assembling.
Assemble the Pie
Preheat oven to 350°F. In a medium bowl, whisk together the 2 whole eggs and 2 tbsp all-purpose flour until smooth. This creates the egg wash that will give your potato crown a beautiful golden finish.
Spread the cooled corned beef mixture evenly in a 9-inch pie dish or deep oven-safe skillet. Arrange the baked potato slices in overlapping circles on top, starting from the outer edge and working inward. Brush each layer with the egg wash mixture as you go.
Bake to Golden Perfection
Bake for 30-35 minutes until the potato crown is golden brown and crispy, and the filling is bubbling at the edges. For extra crispiness, broil for 2-3 minutes at the end, watching closely to prevent burning.
Let rest for 10 minutes before slicing - this allows the filling to set slightly and makes serving easier. The result should be a flaky, golden potato crust over a rich, savory corned beef filling that's perfect for a comforting meal.
Pro Tips For Making Canned Corned Beef Pie
- Boil Potatoes Whole First: I learned this the hard way—peeling and slicing raw potatoes before boiling leads to mush. Instead, boil whole russets in salted water until fork-tender (about 15 minutes), then peel and slice. The starch stays intact, and your pie filling won’t turn to glue.
- Drain and Pat Dry Beef: That canned corned beef comes swimming in its own brine. After draining, pat it dry with paper towels—especially if you’re adding heavy cream later. Wet beef dilutes the sauce and makes the pie filling watery. (Yes, even if you’re impatient like me.)
- Sauté Onions Low and Slow: After burning three batches, I finally figured out: onions for this pie need gentle heat. Cook them in butter until translucent (8–10 minutes), not browned. Overcooking turns them bitter, and that flavor sneaks into every bite of your creamy filling.
- Whisk Cream Cold: Sounds weird, but it works: chill your heavy cream before folding it into the potato mixture. Warm cream breaks down faster, and your pie’s sauce will separate if you’re not careful. Stir in just before baking—no need to preheat it. (Your future self will thank you.)
Storing and reheating this canned corned beef pie
Fridge Storage Tips
Store your baked corned beef pie in an airtight container with a paper towel pressed on top to absorb any moisture. This keeps the potato crown crispy for up to 4-5 days in the fridge at 40°F or below.
I like using Glasslock containers because they seal tightly and won’t absorb odors. Honestly, the pie tastes even better the second day as the flavors meld together. 🥧
Freezer Prep Guide
For longer storage, wrap the pie tightly in double-layered aluminum foil followed by plastic wrap to prevent freezer burn. Label with the date and freeze for up to 3 months.
When ready to reheat, thaw overnight in the fridge before warming. The potato crown may lose some crispness but recovers beautifully with a quick 5-minute broil after reheating.
Reheating Methods
My preferred method is oven reheating at 350°F for 15-20 minutes until the potato crown is crispy again. For microwave reheating, cover with a damp paper towel and heat in 30-second intervals on 50% power, stirring between each interval.
The goal is to restore that golden crust without making the filling soggy. A quick broil for 2-3 minutes at the end adds that perfect crunch.
Make-Ahead Assembly
You can assemble the pie (without baking) up to 24 hours ahead and refrigerate it. When ready to bake, simply add the egg wash and bake as directed. The filling can also be made 1 day ahead and reheated gently before assembling.
This is a huge time-saver for busy weeknights. Just make sure to bring everything to room temperature before baking for even cooking.
Reviving Leftovers
If your potato crown loses crispness, don’t worry—it’s an easy fix. Place slices on a baking sheet and broil for 3-5 minutes until golden again. For the filling, a quick stir on the stovetop with 1-2 tbsp water or broth restores its creamy texture.
I’ve even revived slightly soggy pies by baking them at 375°F for 10 minutes with a fresh egg wash. It’s like bringing it back to life! ✨
Serving Suggestions
Serve this pie with a side of steamed green beans or a crisp mixed greens salad> to balance the richness. A glass of dry Riesling complements the savory filling beautifully.
For extra flair, garnish with fresh parsley or a sprinkle of crumbled blue cheese before serving. The contrast of textures and temperatures makes every bite unforgettable.
Nutrition facts
Frequently asked questions
Can I use instant potatoes for the crown topping?
Instant potatoes won't work for this recipe—they lack the starch needed to create a crispy, flaky crown. The recipe requires fresh russet or Yukon Gold potatoes for that perfect texture. If you're short on time, you could try pre-cooked potato slices from the grocery store, but they won't be as flavorful or crispy.
How do I prevent the potato crown from getting soggy?
Always bake the potato slices until completely tender and let them cool completely before assembling. Also, make sure your filling is fully cooled before layering. If the crown still gets soggy, try brushing it with an extra light coat of egg wash before baking. The key is patience—don't rush the cooling step!
Can I make this pie without a pie dish?
Use a deep oven-safe skillet or even a baking dish with high sides. The important part is that your container can hold the filling and crown layers without spilling. Just make sure it's large enough to accommodate the pie's spread after baking. A 9-inch round or 8x8-inch square dish both work well.
What's the best way to reheat this pie?
For best results, reheat at 350°F for 15-20 minutes until the potato crown is crispy again. If using a microwave, cover with a damp paper towel and heat in 30-second intervals on 50% power. The oven method preserves the crown's texture much better than microwave reheating.
Can I substitute corned beef hash for the filling?
Yes, but you'll need to adjust the moisture level. Corned beef hash is usually drier, so add 1-2 tbsp extra broth to the filling to achieve the same creamy consistency. The flavor will be slightly different but still delicious. Just make sure to simmer the hash until it's hot before assembling the pie.